Leaderboard
-
Chris
Scripter II6Points8365Posts -

ProjectPact
Script Factory Developer6Points6493Posts -

Czar
Global Moderator6Points23654Posts -
Apaec
Scripter III5Points11174Posts


Popular Content
Showing content with the highest reputation on 06/14/18 in all areas
-
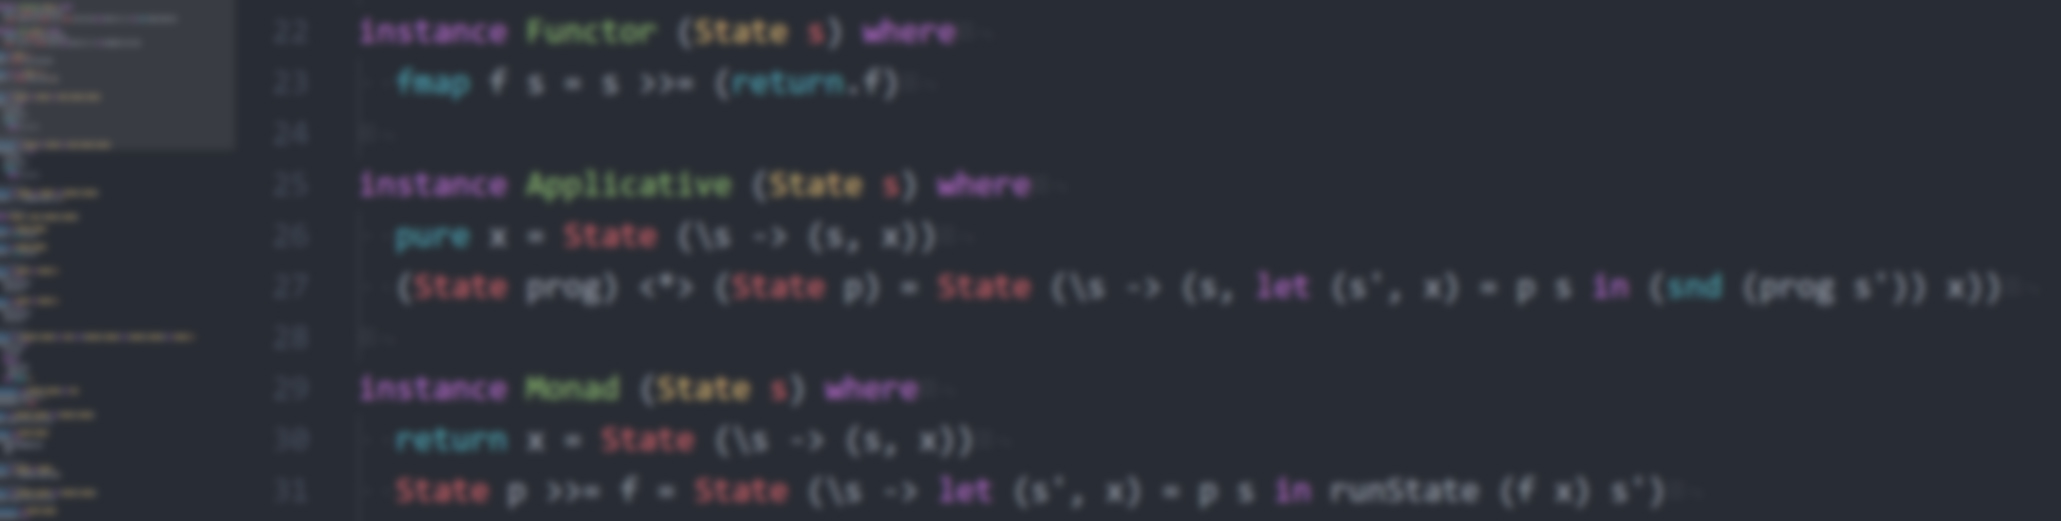
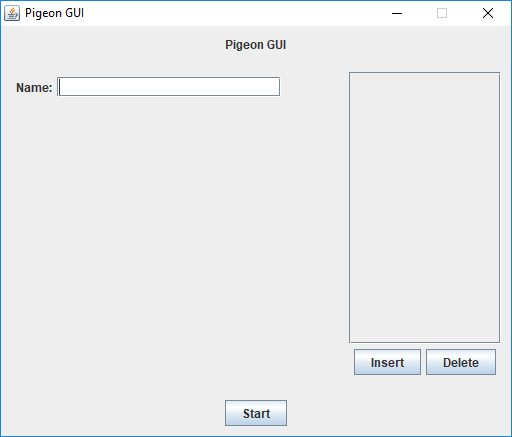
3 points1. DO NOT use absolute positioning (null layout), it's harder to maintain, and can easily looked fucked up on different systems with different configurations. 2. DO NOT use GUI designers/builders, they produce bad code which is hard to maintain, and often is not the best way to build the GUI. You also cannot achieve more advanced things if you're using a builder. Another good reason to do it "by hand", is so that you actually know what you are doing, you will learn nothing from a GUI builder. 3. Look at https://docs.oracle.com/javase/tutorial/uiswing/layout/visual.html, by combining these layout managers in nested JPanels you can easily achieve your desired GUI Here is an example using the GridBagLayout: https://docs.oracle.com/javase/tutorial/uiswing/layout/visual.html#gridbag import javax.swing.*; import javax.swing.border.EmptyBorder; import java.awt.*; import static java.awt.GridBagConstraints.HORIZONTAL; import static java.awt.GridBagConstraints.NONE; public class GUI { private final JFrame jFrame; public GUI() { jFrame = new JFrame("Pigeon GUI"); JPanel mainPanel = new JPanel(new GridBagLayout()); GridBagConstraints gbc = new GridBagConstraints(); jFrame.setContentPane(mainPanel); mainPanel.setBorder(new EmptyBorder(10, 10, 10, 10)); JLabel titleLabel = new JLabel("Pigeon GUI"); gbc.gridx = 0; gbc.gridy = 0; gbc.gridwidth = 4; gbc.insets = new Insets(0, 10, 20, 10); mainPanel.add(titleLabel, gbc); JLabel nameLabel = new JLabel("Name:"); gbc.gridx = 0; gbc.gridy = 1; gbc.gridwidth = 1; gbc.insets = new Insets(0, 0, 0, 5); mainPanel.add(nameLabel, gbc); JTextField nameField = new JTextField(20); gbc.gridx = 1; gbc.gridy = 1; gbc.gridwidth = 1; gbc.insets = new Insets(0, 0, 0, 0); mainPanel.add(nameField, gbc); JScrollPane whitelistScrollPane = new JScrollPane(); JList<String> whitelist = new JList<>(); whitelistScrollPane.add(whitelist); gbc.gridx = 2; gbc.gridy = 1; gbc.ipadx = 200; gbc.ipady = 200; gbc.gridwidth = 2; gbc.insets = new Insets(10, 10, 0, 10); mainPanel.add(whitelistScrollPane, gbc); JButton insertButton = new JButton("Insert"); gbc.gridx = 2; gbc.gridy = 2; gbc.fill = HORIZONTAL; gbc.weightx = 0.5; gbc.gridwidth = 1; gbc.ipadx = 0; gbc.ipady = 0; gbc.insets = new Insets(10, 10, 0, 10); mainPanel.add(insertButton, gbc); JButton deleteButton = new JButton("Delete"); gbc.gridx = 3; gbc.gridy = 2; gbc.fill = HORIZONTAL; gbc.weightx = 0.5; gbc.gridwidth = 1; gbc.ipadx = 0; gbc.ipady = 0; gbc.insets = new Insets(10, 10, 0, 10); mainPanel.add(deleteButton, gbc); JButton startButton = new JButton("Start"); gbc.gridwidth = 4; gbc.gridx = 0; gbc.gridy = 3; gbc.fill = NONE; gbc.insets = new Insets(20, 10, 0, 10); mainPanel.add(startButton, gbc); jFrame.pack(); // resize the JFrame so that all the components are at or above their preferred sizes jFrame.setLocationRelativeTo(null); // center the gui on screen } public void open() { jFrame.setVisible(true); } public void close() { jFrame.setVisible(false); jFrame.dispose(); } public static void main(String[] args) { SwingUtilities.invokeLater(() -> new GUI().open()); } } Here is another example purely using nested JPanels with BorderLayout and FlowLayouts. import javax.swing.*; import javax.swing.border.EmptyBorder; import java.awt.*; public class GUI { private final JFrame jFrame; public GUI() { jFrame = new JFrame("Pigeon GUI"); // We want to split the GUI into three sections, title at the top, inputs in the middle, start button at the bottom // To do this we use a BorderLayout: https://docs.oracle.com/javase/tutorial/uiswing/layout/visual.html#border JPanel mainPanel = new JPanel(new BorderLayout()); mainPanel.setPreferredSize(new Dimension(500, 400)); jFrame.setContentPane(mainPanel); // use this panel as the main content panel for the GUI // Create a JPanel to contain the title. Here we use a FlowLayout https://docs.oracle.com/javase/tutorial/uiswing/layout/visual.html#flow // We set the alignment to FlowLayout.CENTER so the title appears in the middle. JPanel titlePanel = new JPanel(new FlowLayout(FlowLayout.CENTER)); titlePanel.setBorder(new EmptyBorder(5, 5, 5, 5)); // We give the JPanel an empty border of 5px, so that there is some padding JLabel titleLabel = new JLabel("Pigeon GUI"); titlePanel.add(titleLabel); mainPanel.add(titlePanel, BorderLayout.NORTH); // Add the title to the North side of the main panel // Create a JPanel to contain the main GUI inputs (textfield and whitelist) JPanel inputsPanel = new JPanel(new BorderLayout()); // Create a JPanel to contain the name label and name input JPanel namePanel = new JPanel(new FlowLayout(FlowLayout.LEFT)); namePanel.setBorder(new EmptyBorder(10, 10, 10, 10)); JLabel nameLabel = new JLabel("Name:"); namePanel.add(nameLabel); JTextField nameField = new JTextField(20); namePanel.add(nameField); inputsPanel.add(namePanel, BorderLayout.WEST); // Create a JPanel to contain the whitelist and buttons JPanel whitelistPanel = new JPanel(new BorderLayout()); whitelistPanel.setBorder(new EmptyBorder(10, 10, 10, 10)); inputsPanel.add(whitelistPanel, BorderLayout.EAST); // Create a JScrollPane to contain the whitelist // Add the JScrollPane to the whitelistpanel above JScrollPane whitelistScrollPane = new JScrollPane(); JList<String> whitelist = new JList<>(); whitelistScrollPane.add(whitelist); whitelistPanel.add(whitelistScrollPane, BorderLayout.CENTER); // Create a JPanel to contain the whitelist buttons JPanel whitelistButtons = new JPanel(new FlowLayout(FlowLayout.CENTER)); JButton insertButton = new JButton("Insert"); whitelistButtons.add(insertButton); JButton deleteButton = new JButton("Delete"); whitelistButtons.add(deleteButton); whitelistPanel.add(whitelistButtons, BorderLayout.SOUTH); mainPanel.add(inputsPanel, BorderLayout.CENTER); // Add the inputs panel to the centre of the main panel // Crete a JPanel to contain the start button JPanel buttonPanel = new JPanel(new FlowLayout(FlowLayout.CENTER)); buttonPanel.setBorder(new EmptyBorder(5, 5, 5, 5)); JButton startButton = new JButton("Start"); buttonPanel.add(startButton); mainPanel.add(buttonPanel, BorderLayout.SOUTH); // Add the button panel to the south of the main panel jFrame.pack(); // resize the JFrame so that all the components are at or above their preferred sizes jFrame.setResizable(false); jFrame.setLocationRelativeTo(null); // center the gui on screen } public void open() { jFrame.setVisible(true); } public void close() { jFrame.setVisible(false); jFrame.dispose(); } public static void main(String[] args) { SwingUtilities.invokeLater(() -> new GUI().open()); } }
 3 points
 -
👑CzarScripts #1 Bots 👑 👑 LATEST BOTS 👑 If you want a trial - just post below with the script name, you can choose multiple too. 👑 Requirements 👑 Hit 'like' 👍 on this thread2 points
-
funny you should mention that! for the low price of 9.99 for life, you could own your very own FruityNMZ!2 points
-
2 points
-
2 points
-
1 pointWant to buy with OSGP? Contact me on Discord! Detailed feature list: - Account builder mode to level your firemaking to level 50 or even higher. - Equips pyromancer gear option - Chopping and burning logs (base Option) - Relights brazier - Fletch option - Fix brazier option - Make potion and heal pyromancer when down option - Tons of food supported - Brazier swicthing when pyromancer is down - Advanced game settings to skip games, smart caluclate points, afk at certain points, ... - Bank or Open crates - Dragon axe special attack - Fletch at brazier option - Chop in safespot option - Worldhopping - CLI support for goldfarmers Custom Breakmanager: - Setup Bot and break times - Randomize your break times - Stop script on certain conditions (Stop on first break, Stop after X amount of minutes, Stop when skill level is reached) - Worldhopping - Crucial part to botting in 2023! Script queueing: - Support queueing multiple script in a row - All Khal scripts support flawless transitions in between scripts - Start creating your acc in a few clicks from scratch to multiple 99's - Flawless CLI support - Learn more here: How to use CLI parameters: - Example Usage: -script 909:ScriptFile.BreakFile.DiscordFile SAVEFILE = Saved Filename BREAKFILE = Breakmanager Filename - SAVEFILE: Save file can be created in the GUI. Navigate to the tab you want to run and press "Save As CLI file". Please choose your filename wisely (No special characters) - BREAKFILE (Optional): Breakfile can also be create in the GUI, set the breaksettings you wish to use and press "Save new CLI BreakFile". Please choose your filename wisely (No special characters) - Final form (Note that with some bot managers you do not need to specify -script 909): -script 909:TaskList1.4515breaks (With breaks) -script 909:TaskList1.4515breaks.discord1 (With breaks & discord) -script 909:TaskList1..discord1 (NO breaks & discord) Proggies:1 point
-
1 point────────────── PREMIUM SUITE ────────────── ─────────────── FREE / VIP+ ─────────────── ──────────────────────────────────────────────────────────── ⌠ Sand crabs - $4,99 | Rooftop Agility - $5,99 | AIO Smither - $4,99 | AIO Cooker - $3,99 | Unicow Killer - £3,99 | Chest Thiever - £2,99 | Rock crabs - $4,99 | Rune Sudoku - $9,99 ⌡ ⌠ AIO Herblore - FREE & OPEN-SOURCE | Auto Alcher - FREE | Den Cooker - FREE | Gilded Altar - FREE | AIO Miner - VIP+ ⌡ ──────────────────────────────────── What is a trial? A trial is a chance for you to give any of my scripts a test run. After following the instructions below, you will receive unrestricted access to the respective script for 24 hours starting when the trial is assigned. Your trial request will be processed when I log in. The trial lasts for 24 hours to cater for time zones, such that no matter when I start the trial, you should still get a chance to use the script. Rules: Only 1 trial per user per script. How to get a trial: 'Like' this thread AND the corresponding script thread using the button at the bottom right of the original post. Reply to this thread with the name of the script you would like a trial for. Your request will be processed as soon as I log in. If i'm taking a while, i'm probably asleep! Check back in the morning Once I process your request, you will have the script in your collection (just like any other SDN script) for 24 hours. Private scripts: Unfortunately I do not currently offer private scripts. ________________________________________ Thanks in advance and enjoy your trial! -Apaec.1 point
-
1 pointby Czar Buy now (only $8.99!) 143 HOURS IN ONE GO!!!!! update: this bot is now featured on the front page of osbot! More reviews than every other fishing bot combined! 100 hour progress report!!! How to use Script Queue: ID is 552, and the parameters will be the profile name that you saved in setup! This process is really simple, just to save you headache1 point
-
1 pointHello OS botters, My name's Azeem and I am 19 years old. I live in Toronto/Canada & I'm currently studying electrical engineering. I'm interested in business/marketing, playing games & coding. I'm usually known as 'Azeem' on other forums. Looking forward to meet some of you very soon. Regards Night Fury1 point
-
1 point
-
1 pointnice to know theres allot more people enjoying the traffick in Toronto like I do...and the retards driving around in Toyotas ….seems like every retard driving drives a Toyota...1 point
-
1 point
-
1 point
-
1 point
-
1 point
-
1 pointHey welcome to the osbot, nice to see more people from toronto area1 point
-
1 pointi have an 70def 80range 85mage with regicide/avas only need mage cape just pm me if u like to buy it1 point
-
1 point
-
Hmn, and you did set the reset location using the GUI buttons? If the state is displays is stuck on "waiting" instead of "resetting", this means it is actually counting down to when it will reset. This number is random each time, to mimic human behaviour (you wouldn't immediately look on your screen the second the crabs deaggro, and reset them, would you?). This delay can last anywhere from near-instantaneous to a few minutes. I think this might be what you have encountered. If you (or other people) encounter the same issue, let me know! Thanks! And yes, I'll look at banking in the future, whenever I have some time to spare. (might be a week or three). In the meantime: use high healing food (I lasted 1-2 hours on my 1 defence pure, using monkfish. Sharks would be even better. Or get a spot on the mainland with 2 crabs instead of 3-4). I honestly wouldn't recommend leaving this script unattended for long periods of time, like overnight, I have done zero testing when it comes to long term stability.1 point
-
1 pointGUI builders let you pick which layout you want to use. This is important. A null layout will require you to specify the size and position of every component, whereas other layouts (GridBagLayout, BoxLayout, FlowLayout) automatically arrange your components, but you get to specify how they're arranged. You should write your own GUIs from scratch so you can build your GUIs exactly how you need them to be. I've never used that builder, so no comment. You're welcome. You're using a GUI builder. Why would somebody make an advanced tutorial for you when you're not going to learn the how's/why's of the actual underlying code?1 point
-
1 pointv2 fix has been pushed as mentioned above, join discord for updates: https://discord.gg/W3PUkpQ everyone who has v2 also has v1 as v2 is in testing stages, use v1 whilst it is down and ill update when its back up1 point
-
1 pointFix had been pushed for now dont use barrows gear and tick "repair barrows items" or use v11 point
-
1 point
-
1 point
-
1 point
-
1 point
-
1 point1 point1 point1 point1 pointLooking at your code, I recommend you not playing with trades since you will need some additional checks to make sure you trade the right player etc. etc. Start with something more easy, like a cow killer or a woodcutter.1 point1 point1 point1 point1 point1 pointhttps://www.mathsisfun.com/algebra/trig-interactive-unit-circle.html Play around with this. Edit: My mistake it looks like you already did some research, I'll toy around with it this weekend. Im sure there's some sort of reason.1 point1 pointI was looking to some snippets and found a camera system from @Lemons and there is that thing which confused me.. Here are the functions implementation of moving the current angel of the camera to a specific position/direction public void moveNorth() { int r = Script.random(0, 30); if (r > 15) r = 375 - r; moveYaw(r); } public void moveWest() { moveYaw(75 + Script.random(0, 30)); } public void moveSouth() { moveYaw(165 + Script.random(0, 30)); } public void moveEast() { moveYaw(255 + Script.random(0, 30)); } And I was trying to write functions to check where the camera direction is and came up with the following: public boolean isNorth() { return (getYawAngle() >= 0 && getYawAngle() < 75) || getYawAngle() == 360; } public boolean isWest() { return getYawAngle() >= 75 && getYawAngle() < 165; } public boolean isSouth() { return getYawAngle() >= 165 && getYawAngle() < 255; } public boolean isEast() { return getYawAngle() >= 255 && getYawAngle() < 360; } It is a little bit strange to me because it should be north, east, south, and west and the angels should be 0-90, 90-180, 180-270, 270-360 However, it seems to be counterclockwise and 0-90 would include both east and north https://www.mathsisfun.com/geometry/images/degrees-360.gif In this case, north should be -75-75 not 0-75 but someone seems to have defined it that way and it looks rather arbitrary. (Might be the absolute value of that range, as Zappster told me from chats). My question is "why's this thing like that?" Is it because the developer made it that way? Another question is.. Why when checking west, the range is 75-165 but when moving to west, the range is 75 + 0,30 which could maximally reach 105? In addition, could someone help me write a function to check the north-east or south-west direction then?1 point1 pointYou should try it, for what I've been using it for (don't want to leak) it's been VERY effective. In regards to the bot bit you mentioned, you wouldn't loop one cycle of whatever you're doing. You'd loop like 15+ mins of whatever it is you're wanting to loop. Bot smart friend1 point1 pointThere are many factors which can result in a ban, and worst of all bans are unpredictable and pretty random. To minimise your chances, play it safe - keep sessions short, use generous breaks, play legitimately in between, and most of all, make sure you accept that there is always a risk! Don't bot on an account that you don't want to get banned. -Apa1 pointIIRC there was an update where you can create, move around and delete rooms from an interface in the settings menu. That should be your starting point! Also, widgets are what you're looking for: https://osbot.org/api/org/osbot/rs07/api/Widgets.html Apa1 point1 pointYeah GE is experimental but it does work, but you gotta be super precise with the setup in ge mode. I still have some core changes to add to the setup to allow GE to work properly. Update v46 is live but I am working on v47 with the new changes, sorry for the delay I will change paint and add space-bar instead of mouse clicks for that update1 point1 pointGot another update coming up, will add more various failsafes and more support for various spells and equipment. Update coming up ^^1 point1 point1 pointDecent script. The BIG issue for me is that the bot will take out your entire stack of seeds and teleports and constantly dies in Canifis with it all and rips your bank apart. Please fix this @eagle, there is absolutely NO NEED to take out 200+ seeds of anything when there's no more than 5 patches and the bot banks after like 1 or 2 anyway because of the way you've set up the timers. EDIT: Eagle won't fix this even though it's a 2 minute fix (replace withdraw-all with withdraw-10 in his code) because he thinks I'm the only one dying at Canifis. So if you're one of the doods who have died at Canifis or avoid using that patch all together because of the risk please quote/like this post so he can see it's worth fixing.1 pointCode looks clean well done. Only thing I'd suggest is using Conditional sleeps.1 pointah, back when u could bot and no one at Jagex HQ asked questions about how you simultaneously did frost dragons on 15 accounts for 40 hours straight. good times1 pointawesome! gonna try this out1 point1 pointTrial please? just tried made 2 accs for orbing but the script i thought was good on Advertising other bots isn't allowed. actually sucks.. trying to find another option1 point1 point1 point1 point1 point