Leaderboard
-

ProjectPact
Script Factory Developer6Points6493Posts -

Czar
Global Moderator6Points23654Posts -
Chris
Scripter II6Points8365Posts -

Apaec
Scripter III5Points11174Posts


Popular Content
Showing content with the highest reputation on 06/14/18 in Posts
-
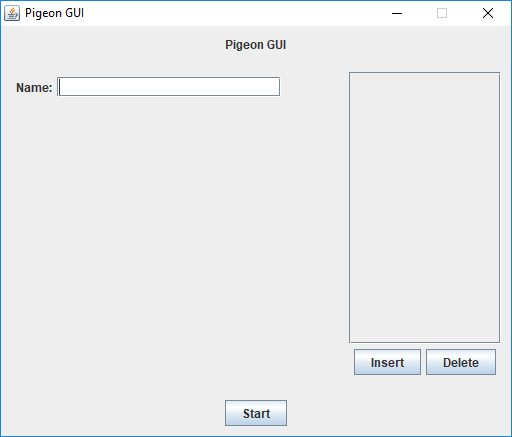
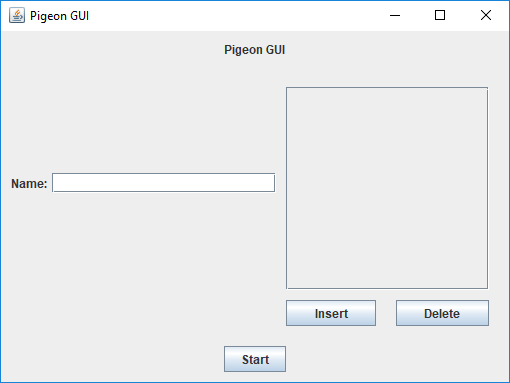
3 points1. DO NOT use absolute positioning (null layout), it's harder to maintain, and can easily looked fucked up on different systems with different configurations. 2. DO NOT use GUI designers/builders, they produce bad code which is hard to maintain, and often is not the best way to build the GUI. You also cannot achieve more advanced things if you're using a builder. Another good reason to do it "by hand", is so that you actually know what you are doing, you will learn nothing from a GUI builder. 3. Look at https://docs.oracle.com/javase/tutorial/uiswing/layout/visual.html, by combining these layout managers in nested JPanels you can easily achieve your desired GUI Here is an example using the GridBagLayout: https://docs.oracle.com/javase/tutorial/uiswing/layout/visual.html#gridbag import javax.swing.*; import javax.swing.border.EmptyBorder; import java.awt.*; import static java.awt.GridBagConstraints.HORIZONTAL; import static java.awt.GridBagConstraints.NONE; public class GUI { private final JFrame jFrame; public GUI() { jFrame = new JFrame("Pigeon GUI"); JPanel mainPanel = new JPanel(new GridBagLayout()); GridBagConstraints gbc = new GridBagConstraints(); jFrame.setContentPane(mainPanel); mainPanel.setBorder(new EmptyBorder(10, 10, 10, 10)); JLabel titleLabel = new JLabel("Pigeon GUI"); gbc.gridx = 0; gbc.gridy = 0; gbc.gridwidth = 4; gbc.insets = new Insets(0, 10, 20, 10); mainPanel.add(titleLabel, gbc); JLabel nameLabel = new JLabel("Name:"); gbc.gridx = 0; gbc.gridy = 1; gbc.gridwidth = 1; gbc.insets = new Insets(0, 0, 0, 5); mainPanel.add(nameLabel, gbc); JTextField nameField = new JTextField(20); gbc.gridx = 1; gbc.gridy = 1; gbc.gridwidth = 1; gbc.insets = new Insets(0, 0, 0, 0); mainPanel.add(nameField, gbc); JScrollPane whitelistScrollPane = new JScrollPane(); JList<String> whitelist = new JList<>(); whitelistScrollPane.add(whitelist); gbc.gridx = 2; gbc.gridy = 1; gbc.ipadx = 200; gbc.ipady = 200; gbc.gridwidth = 2; gbc.insets = new Insets(10, 10, 0, 10); mainPanel.add(whitelistScrollPane, gbc); JButton insertButton = new JButton("Insert"); gbc.gridx = 2; gbc.gridy = 2; gbc.fill = HORIZONTAL; gbc.weightx = 0.5; gbc.gridwidth = 1; gbc.ipadx = 0; gbc.ipady = 0; gbc.insets = new Insets(10, 10, 0, 10); mainPanel.add(insertButton, gbc); JButton deleteButton = new JButton("Delete"); gbc.gridx = 3; gbc.gridy = 2; gbc.fill = HORIZONTAL; gbc.weightx = 0.5; gbc.gridwidth = 1; gbc.ipadx = 0; gbc.ipady = 0; gbc.insets = new Insets(10, 10, 0, 10); mainPanel.add(deleteButton, gbc); JButton startButton = new JButton("Start"); gbc.gridwidth = 4; gbc.gridx = 0; gbc.gridy = 3; gbc.fill = NONE; gbc.insets = new Insets(20, 10, 0, 10); mainPanel.add(startButton, gbc); jFrame.pack(); // resize the JFrame so that all the components are at or above their preferred sizes jFrame.setLocationRelativeTo(null); // center the gui on screen } public void open() { jFrame.setVisible(true); } public void close() { jFrame.setVisible(false); jFrame.dispose(); } public static void main(String[] args) { SwingUtilities.invokeLater(() -> new GUI().open()); } } Here is another example purely using nested JPanels with BorderLayout and FlowLayouts. import javax.swing.*; import javax.swing.border.EmptyBorder; import java.awt.*; public class GUI { private final JFrame jFrame; public GUI() { jFrame = new JFrame("Pigeon GUI"); // We want to split the GUI into three sections, title at the top, inputs in the middle, start button at the bottom // To do this we use a BorderLayout: https://docs.oracle.com/javase/tutorial/uiswing/layout/visual.html#border JPanel mainPanel = new JPanel(new BorderLayout()); mainPanel.setPreferredSize(new Dimension(500, 400)); jFrame.setContentPane(mainPanel); // use this panel as the main content panel for the GUI // Create a JPanel to contain the title. Here we use a FlowLayout https://docs.oracle.com/javase/tutorial/uiswing/layout/visual.html#flow // We set the alignment to FlowLayout.CENTER so the title appears in the middle. JPanel titlePanel = new JPanel(new FlowLayout(FlowLayout.CENTER)); titlePanel.setBorder(new EmptyBorder(5, 5, 5, 5)); // We give the JPanel an empty border of 5px, so that there is some padding JLabel titleLabel = new JLabel("Pigeon GUI"); titlePanel.add(titleLabel); mainPanel.add(titlePanel, BorderLayout.NORTH); // Add the title to the North side of the main panel // Create a JPanel to contain the main GUI inputs (textfield and whitelist) JPanel inputsPanel = new JPanel(new BorderLayout()); // Create a JPanel to contain the name label and name input JPanel namePanel = new JPanel(new FlowLayout(FlowLayout.LEFT)); namePanel.setBorder(new EmptyBorder(10, 10, 10, 10)); JLabel nameLabel = new JLabel("Name:"); namePanel.add(nameLabel); JTextField nameField = new JTextField(20); namePanel.add(nameField); inputsPanel.add(namePanel, BorderLayout.WEST); // Create a JPanel to contain the whitelist and buttons JPanel whitelistPanel = new JPanel(new BorderLayout()); whitelistPanel.setBorder(new EmptyBorder(10, 10, 10, 10)); inputsPanel.add(whitelistPanel, BorderLayout.EAST); // Create a JScrollPane to contain the whitelist // Add the JScrollPane to the whitelistpanel above JScrollPane whitelistScrollPane = new JScrollPane(); JList<String> whitelist = new JList<>(); whitelistScrollPane.add(whitelist); whitelistPanel.add(whitelistScrollPane, BorderLayout.CENTER); // Create a JPanel to contain the whitelist buttons JPanel whitelistButtons = new JPanel(new FlowLayout(FlowLayout.CENTER)); JButton insertButton = new JButton("Insert"); whitelistButtons.add(insertButton); JButton deleteButton = new JButton("Delete"); whitelistButtons.add(deleteButton); whitelistPanel.add(whitelistButtons, BorderLayout.SOUTH); mainPanel.add(inputsPanel, BorderLayout.CENTER); // Add the inputs panel to the centre of the main panel // Crete a JPanel to contain the start button JPanel buttonPanel = new JPanel(new FlowLayout(FlowLayout.CENTER)); buttonPanel.setBorder(new EmptyBorder(5, 5, 5, 5)); JButton startButton = new JButton("Start"); buttonPanel.add(startButton); mainPanel.add(buttonPanel, BorderLayout.SOUTH); // Add the button panel to the south of the main panel jFrame.pack(); // resize the JFrame so that all the components are at or above their preferred sizes jFrame.setResizable(false); jFrame.setLocationRelativeTo(null); // center the gui on screen } public void open() { jFrame.setVisible(true); } public void close() { jFrame.setVisible(false); jFrame.dispose(); } public static void main(String[] args) { SwingUtilities.invokeLater(() -> new GUI().open()); } }
 3 points
 -
👑CzarScripts #1 Bots 👑 👑 LATEST BOTS 👑 If you want a trial - just post below with the script name, you can choose multiple too. 👑 Requirements 👑 Hit 'like' 👍 on this thread2 points
-
funny you should mention that! for the low price of 9.99 for life, you could own your very own FruityNMZ!2 points
-
2 points
-
2 points
-
1 point────────────── PREMIUM SUITE ────────────── ─────────────── FREE / VIP+ ─────────────── ──────────────────────────────────────────────────────────── ⌠ Sand crabs - $4,99 | Rooftop Agility - $5,99 | AIO Smither - $4,99 | AIO Cooker - $3,99 | Unicow Killer - £3,99 | Chest Thiever - £2,99 | Rock crabs - $4,99 | Rune Sudoku - $9,99 ⌡ ⌠ AIO Herblore - FREE & OPEN-SOURCE | Auto Alcher - FREE | Den Cooker - FREE | Gilded Altar - FREE | AIO Miner - VIP+ ⌡ ──────────────────────────────────── What is a trial? A trial is a chance for you to give any of my scripts a test run. After following the instructions below, you will receive unrestricted access to the respective script for 24 hours starting when the trial is assigned. Your trial request will be processed when I log in. The trial lasts for 24 hours to cater for time zones, such that no matter when I start the trial, you should still get a chance to use the script. Rules: Only 1 trial per user per script. How to get a trial: 'Like' this thread AND the corresponding script thread using the button at the bottom right of the original post. Reply to this thread with the name of the script you would like a trial for. Your request will be processed as soon as I log in. If i'm taking a while, i'm probably asleep! Check back in the morning Once I process your request, you will have the script in your collection (just like any other SDN script) for 24 hours. Private scripts: Unfortunately I do not currently offer private scripts. ________________________________________ Thanks in advance and enjoy your trial! -Apaec.1 point
-
1 point#1 SOLD MAGIC SCRIPT #1 MOST FEATURES MAGIC SCRIPT ESC MODE, HOVER-CLICK, NEAREST ITEM CLICK, FLAWLESS JMod nearby and we still alive. Anti-ban and Optimal script usage Anti-ban: - Don't go botting more than 3 hours at once, take breaks! Otherwise the ban-rate is highly increased! - Bans also depend on where you bot, for the best results: bot in unpopular locations Banking-related spells are the lowest ban-rate (spells which require banking or can be casted near a bank, e.g. superheating, maybe alching, jewelry enchanting etc etc) since you can just go to a full world and blend in with other non-bots (humans), for example: world 2 grand exchange If casting spells on npcs, then unpopular locations reduce the banrate by alot, So make sure not to go to botting hotspots otherwise you may be included in ban waves. - Some good areas used to be (until some got popular): grizzly bear, yanille stun-alching, any overground tiles (upstairs etc) but once the areas are overpopulated, try to go to another location which is similar to the aforementioned locations. This is a very popular thread with many many users so if a new location is mentioned, the location will be populated very quickly so I can only suggest examples of good locations - Don't go botting straight after a game update, it can be a very easy way to get banned. Wait a few hours! If you ever get banned, just backtrack your mistakes and avoid them in the future: you cannot be banned without making botting mistakes. Keep in mind you can be delay-banned from using previous scripts, so don't go using free/crap scripts for 24 hours then switching to a premium script, because the free/crap previous script can still get you banned! For more anti-ban information, see this thread which was created by an official developer: http://osbot.org/forum/topic/45618-preventing-rs-botting-bans/1 point
-
1 pointView in store $5.99 for lifetime access _____________________________________________________________ Key Features: Progressive mode - The script will traverse the xp-optimum course for your current level; walking to the next course as your level increases. Reliability - The script was developed and rigidly tested with superior reliability in mind. Human replication - Designed around human simulation - behaviour tuned to replicate common rooftop play styles. Alching / Magic Imbue - The script can be configured to High/Low Alch items, or cast Magic Imbue as it traverses the course. Target system - Can be optionally configured with a target. Once this target is achieved, the script will stop. Available targets (variable λ): Stop when λ agility exp gained. Stop when agility level λ reached. Stop when λ magic exp gained. Stop when magic level λ reached. Stop when λ minutes passed. Healing - The script will consume edible items in your inventory to restore health, stopping if you run out of food. Mark of Grace looting - All marks of grace are looted while the script traverses the rooftop. Randomisation - All thresholds (including but not limited to Run energy and Critical Hp) are dynamically randomised. Energy restoration - The script will consume energy restoring items/potions when needed, provided they are available in the inventory. Web-Walking - The script utilises the OSBot Web to navigate the OSRS map, meaning it can be started from almost anywhere. Course detection - If you are on/near a rooftop course before setup, the course will automatically be loaded into the GUI. Error correction - The script will detect when it has made a mistake (e.g. climbed ladder in seers' bank) and will attempt to return to the course. ...and many more! Supported Rooftops: (Level 10) Draynor ✓ (Level 20) Al-Kharid ✓ (Level 30) Varrock ✓ (Level 40) Canifis ✓ (Level 50) Falador ✓ (Level 60) Seers' Village ✓ (Level 70) Pollnivneach ✓ (Level 80) Rellekka ✓ (Level 90) Ardougne ✓ Things to consider before trying/buying: Avoiding bans - while I have done my utmost to make the script move and behave naturally, bans do occasionally happen, albeit rarely. To minimise your chances of receiving a ban, I would strongly suggest reviewing this thread written by the lead content developer of OSBot. If you take on board the advice given in that thread and run sensible botting periods with generous breaks, you should be fine. That being said, please keep in mind that botting is against the Oldschool Runescape game rules, thus your account will never be completely safe and you use this software at your own risk. Web-walking - alongside a network of paths, the script moves around with the OSBot web-walking system, using it when in unknown territory. While it has proven very reliable, there are naturally some areas for which the web-walker may struggle. As a result, prior to starting the script, I would strongly recommend manually navigating your player to/close to the desired rooftop course. Progressive mode - the script features 'Progressive mode' which will cause the script to advance rooftop courses as you level up. Progressive mode relies on the aforementioned web-walking system for inter-rooftop navigation. Consequently, I would highly recommend monitoring the script as it traverses between courses to ensure the web-walking process correctly executes. Healing & Energy restoration - the script will automatically heal or restore run energy when needed. It will do so by consuming items in the inventory - this script will not bank. For optimal exp rates, I would strongly suggest keeping energy restoring items in the inventory (energy/super energy/stamina/fruits/summer pies/purple sweets/...). To prevent the script stopping prematurely, bring a few bites of food along. Using magic - The script supports the periodic casting of a magic spell while traversing a course to maximise experience rates. To determine whether or not you can cast a spell, the script checks your magic level as well as which runes are in your inventory and which stave you have equipped (if any). It is worth noting that, at this time, the script does not recognise any of the following items as rune sources, so avoid using them while running this script: Bryophyta's Staff, Tome of Fire, Rune Pouch. Script trials: I believe that trying a script before buying is paramount. After trying the script, hopefully you will be convinced to get a copy for yourself, but if not you will have gained some precious agility experience! If you're interested in a trial, please follow the instructions on my trials thread which can be found here. Gallery: Review (by Eduardino): Start up GUI (Graphical User Interface): Paint (optional, movable and self-generating): User screenshots: Testimonials:1 point
-
1 pointCape's AIO Progressive Woodcutter Created by @Team Cape Need quick levels but don't want to keep restarting your bot to go from trees, to oaks, to willows, to maples, to yews, etc? Want to get WC over with, or just make some quick GP? Want to get that Lost City requirement out of the way, but can't bare the monotony of woodcutting? Cape's AIO Progressive Woodcutter is YOUR solution. Features: 1. Create and add your own tasks for the script to execute! 2. Task-based progression! Watch this script flawlessly switch from Lumbridge trees, to Draynor oaks, to Draynor willows, to Camelot maples, Camelot yews, and so forth! Until you want it to stop! 3. OR use custom mode - Start the script at the location you want to woodcut at, type the name of the tree, and start chopping those trees! Need to bank instead of powerchopping? Just select the bank from the list, and let it go! 4. Banking - You get to CHOOSE which tasks you bank on! 5. Powerchop - You get to CHOOSE which tasks you powerchop on! 6. Automatically takes the best axe from your bank and upgrades as the script continues! Just tick banking on, and watch the script upgrade from iron, to steel, to any better axe that you have! 7. Supports all trees! 8. Supports the Woodcutting Guild! 9. Supports Powerchopping and Banking at Redwood Trees! 10. Takes Bird Nests if Desired! 11. Supports the Dragon Axe Special if you Tick the Box! 12. Draw tree models, so you can see what tree is about to be chopped next, and the tree that the script is currently planning on chopping! 13. 50+ Preset Locations created, meaning there are a virtually infinite number of paths that you could take to level your woodcutting! 14. Custom-created location lookup, so you can easily find and pick which location you want to chop at! 15. A sleek GUI that you can easily use to setup your personal leveling path, and a flawless paint to show how your levels have progressed and the task you're currently on! 16. Flawlessly created to give you flawless results! Want more locations? Just ask in the thread below! Antiban / Antipattern: 1. Random & Dynamic Sleeps Utilized in Each Action and Loop! 2. Enable Timing Anti-Pattern and Watch as the Script Changes Sleeping Times Used Every Few Minutes, Meaning Your Sleeping Times Never Have One Consistent, Uniform Distribution! 3. Utilize AFK Mode to go Randomly AFK, Like a Real Player! 4. Random Actions Utilized to Keep You Logged In! Where can I obtain this script? Simply go into the Woodcutting section of the OSBot store, found at the link below, and scroll to the bottom! Pay $8.99 once, and enjoy unlimited usage of this unique script! https://osbot.org/mvc/sdn2/scripts/20 How do I Start to Use this Script!? After buying the script from the OSBot store for just $8.99, simply load up the client, go into your script selector, and the script will have appeared in your list! Click on it, press start, and the GUI will pop up! From there, create whatever tasks and select whatever settings YOU want! What if I don't Want/Need to Progressively Level? That's fine! Just use custom location mode, OR use a preset location and set it to start at your current level! The script will work exactly as desired! How Do I Set Up Progressive Leveling? In the GUI, you'll be given the unique option to add in custom woodcutting tasks! Here is how it's done! 1. Open the second tab of the GUI (Progression Tab) 2. Select a location from the drop-down menu (There are over 50! so there is a location lookup option if you choose to use it!). 3. After selecting a location, check whether you want to bank when using the task (if left unchecked, it will powerchop for you!) 4. Set what level you want to start the task at! 5. From there, just hit 'Add Location', and you'll see your task immediately pop up in the task list! 6. Add in as many tasks as you want! Happy botting! What's the catch? There is none. Just a flawless script. It really is that simple. Can I get a free 24 hour trial of the script? Of course! Just drop a like on the thread and ask for a trial below! Last proggie courtesy of @Scripter_Leo! Like the script? Post a proggie below, or rate the script on the store! Those are the best ways to help out! Script GUI: If you really enjoy the script, rate it 5 stars on the OSBot store or comment below with a proggie!1 point
-
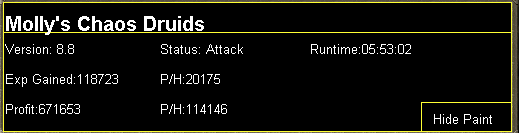
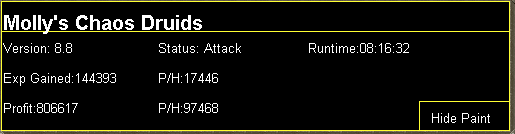
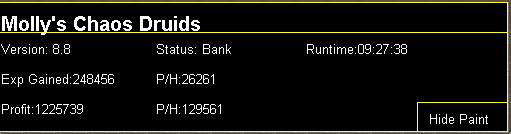
1 pointMolly's Chaos Druids This script fights chaos druids in Taverly dungeon, Edgeville dungeon and Ardougne. Profits can easily exceed 200k p/h and 60k combat exp/ph, this is a great method for training low level accounts and pures. Buy HERE Like this post and then post on this thread requesting a 24hr trial. When I have given you a trial I will like your post so you will receive a notification letting you know you got a trial. Requirements - 46 Thieving for Ardougne -82 Thieving and a Lockpick for Yanille - 5 Agility for Taverly(recommended) - No other requirements! Though I do recommend combat stats of 20+ as a minimum Features: - Supports eating any food - Hopping out of bot worlds - Recovers from deaths(respawn point must be lumbridge), includes re-equipping items on death - Potion support - Automatically detects and withdraws/uses Falador teleport tabs if using Taverly dungeon - Automatically detects and withdraws/equips/uses glories if using Edgeville dungeon - Supports looting bag Setup: Start the script, fill out the GUI, and be in the general area of where you want to run the script. CLI setup: Proggies: In the works: Known bugs: Bug report form, this is a MUST for problems to be resolved quickly: Description of bug(where, what, when, why): Log: Your settings: Mirror mode: Y/N
 1 point
 -
1 point
-
1 point
-
1 point
-
1 point
-
1 point
-
1 pointHey welcome to the osbot, nice to see more people from toronto area1 point
-
1 point
-
1 point
-
1 point1 pointNice script man, got me to 87 cooking! still using it! I'll try post some pics1 point1 pointHmn, and you did set the reset location using the GUI buttons? If the state is displays is stuck on "waiting" instead of "resetting", this means it is actually counting down to when it will reset. This number is random each time, to mimic human behaviour (you wouldn't immediately look on your screen the second the crabs deaggro, and reset them, would you?). This delay can last anywhere from near-instantaneous to a few minutes. I think this might be what you have encountered. If you (or other people) encounter the same issue, let me know! Thanks! And yes, I'll look at banking in the future, whenever I have some time to spare. (might be a week or three). In the meantime: use high healing food (I lasted 1-2 hours on my 1 defence pure, using monkfish. Sharks would be even better. Or get a spot on the mainland with 2 crabs instead of 3-4). I honestly wouldn't recommend leaving this script unattended for long periods of time, like overnight, I have done zero testing when it comes to long term stability.1 point1 point1 point1 pointGreat script, helped me get 99 and level alts as well. Everything was smooth and flawless. A lot of the issues that occur with this script are because of human error and people just not reading the instructions. Thanks again @Eagle Scripts1 pointI would personally look at adding banking due to me using sandcrabs until NMZ stats (like 1-60 att and str) and at those lvls it would most likely need to bank. Other than that it looks really nice.1 point1 point1 pointAngler: 10M Prospector: 35M (assuming average xp/nugget) Hunter: 11.2M RC: 4.5M Hope this helps1 point1 point1 point1 point1 point1 point1 pointLooking at your code, I recommend you not playing with trades since you will need some additional checks to make sure you trade the right player etc. etc. Start with something more easy, like a cow killer or a woodcutter.1 point1 point1 point1. Is there NO GUI builder that allows me to drag and drop elements (like JButton, JList, JTextField, etc.) onto the the application window AND IT STAYS WHERE I PUT IT (meaning i don't have to hard code the exact position of every single element i put into the GUI) (not sure if this'll fix your issue, pretty sure it will) - Change your content pane layout to absolute (null). (I use eclipse guibuilder, so i'm not too sure on the intelliJ version), you can just use the line mainPn1.setLayout(null); 2. Assuming i should still be using IntellJ's GUI form builder, why is there no code about how i customized it in the form onto the output code file - I don't use intelliJ so I can't answer this sorry 3. How do i get the GUI to open in onStart - I would create a "main" void, set the frame equal to a new instance of your PidgeonGUI class, set the frame to visible & then utilize it with PidgeonGUI.main();, this probably isn't the 'right' way to go about it, but I have a "if it works, why change it" mentality about smaller things like this. lmk if any of these help1 point1 pointMine wasn't resetting crabs1 pointAdded a new feature today for mining and woodcutting! Added Equipment type support! Now you may choose between automatically upgrading equipment, or selecting a static piece of equipment to use from Bronze -> Dragon!1 point1 pointyou can get minutes until break using: public int getTimeTillBreak() { RandomExecutor randomExecutor = getBot().getRandomExecutor(); return randomExecutor != null ? randomExecutor.getTimeUntilBreak() : -1; }1 point1 pointYeah GE is experimental but it does work, but you gotta be super precise with the setup in ge mode. I still have some core changes to add to the setup to allow GE to work properly. Update v46 is live but I am working on v47 with the new changes, sorry for the delay I will change paint and add space-bar instead of mouse clicks for that update1 point1 pointGot another update coming up, will add more various failsafes and more support for various spells and equipment. Update coming up ^^1 point1 pointDecent script. The BIG issue for me is that the bot will take out your entire stack of seeds and teleports and constantly dies in Canifis with it all and rips your bank apart. Please fix this @eagle, there is absolutely NO NEED to take out 200+ seeds of anything when there's no more than 5 patches and the bot banks after like 1 or 2 anyway because of the way you've set up the timers. EDIT: Eagle won't fix this even though it's a 2 minute fix (replace withdraw-all with withdraw-10 in his code) because he thinks I'm the only one dying at Canifis. So if you're one of the doods who have died at Canifis or avoid using that patch all together because of the risk please quote/like this post so he can see it's worth fixing.1 pointI'll give it a try! ^^1 pointawesome! gonna try this out1 pointnice, i will try it today to give you my opinion1 point1 point1 pointBone crossbow w/ Bone bolts @ Graveyard Green Dragons Using safespot two w/ these GUI settings #Dragon GUI Settings #Sat Jun 09 15:26:43 EDT 2018 checkEatToFull=true textFoodAmount=2 checkBurningAndGlory=false checkRanarrWeed=true radioWorldHopper=false radioStrengthPotionRegular=false checkRegularWalker=false radioAttackPotionSuper=false radioSpecialAttack=false checkAdamantHelm=false checkWalkToBank=false checkGloryAndGames=false checkLootingBag=true radioMagicPotion=false radioSafeSpot=true radioRangePotion=true radioStrengthPotionSuper=false textWorldHopCount=7 checkRespawnTeleport=false comboDragonsMode=Green dragons(Graveyard) radioCombatPotion=false checkAutoEatAt=false checkNatureRune=true textEatAt=60 checkAdamaniteOre=true checkBuryBones=false checkGamesAndDueling=true radioAntipoisonPotion=false checkRubyDiamondCombo=false checkSafetyTeleport=false checkRuneDagger=true checkLootAmmo=false radioAttackPotionRegular=false checkBlowpipeActive=false radioAntifirePotion=false checkDragonhide=true checkDragonBones=true checkGloryOnly=false textLootDistance=13 safeSpot=3148,3688,0 checkAntiPK=false checkEnduranceItem=false checkClueScroll=false checkBurningAndDueling=false comboFoodType=Lobster checkDeathwalking=true1 point"Convert strings from files to generate different classes", so essentially ClassReader/Loader? That's not really necessary when you could probably use serialization for whatever you are doing instead - or perhaps it can just be solved with simple file management? We would need more context on what you're trying to do.1 point1 point1 pointWtf its a stacked card, casuals probly only looking at main tho xd Whittaker RDA Holm Tuivasa Jackson1 point